If you’re looking for a healthy and tasty alternative to potatoes, yuca or cassava might be just what you need. This starchy root vegetable, also known as manioc, is a staple food in many parts of the world, from South America and Africa to Asia and the Caribbean. But is yuca or cassava healthy? And what are some of the most popular ways to cook and serve it? Let’s find out.
Yuca or cassava is a great source of carbohydrates, fiber, and various vitamins and minerals. Here are some of the health benefits of this versatile root vegetable:
Yuca or cassava is rich in resistant starch, which can improve digestive health, lower blood sugar levels, and promote satiety and weight loss.
Yuca or cassava is a good source of vitamin C, which can boost immunity, collagen production, and iron absorption.
Yuca or cassava is a decent source of potassium, which can regulate blood pressure, fluid balance, and muscle function.
Yuca or cassava is low in fat and cholesterol, which can benefit heart health and overall health.
However, it’s worth noting that yuca or cassava also contains cyanide, a toxic substance that can cause poisoning if consumed in large amounts. To avoid this risk, make sure to peel and cook yuca or cassava properly before eating it.
Classification: setting in which the person has contracted their infection
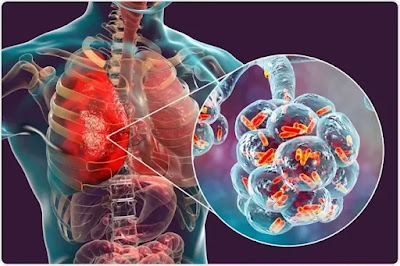
Community-acquired pneumonia (CAP) definition :
It occurs outside hospital setting or less than 48 hours after admission
Hospital-acquired pneumonia (HAP):
Hospital-acquired or nosocomial pneumonia refers to a new episode of pneumonia occurring at least 2 days after admission to hospital.
Contd…
Health care-associated pneumonia (HCAP) :
refers to the development of pneumonia in a person who has spent at least 2 days in hospital within the last 90 days, attended a haemodialysis unit, received intravenous antibiotics, or been resident in a nursing home or other long-term care facility.
Immunocompromised host :
Neutropenic, HIV +, Cancer,Mycobacterium tuberculosis, Pneumocystis jiroveci ,Immunosuppressives
Classification by site of pneumonia
Lobar pnemonia :
Infection can be localized with the whole of one or more lobes affected. >90% of the cases is due to Strep.pneumoniae
Influenza vaccination is recommended to those at high risk of mortality from influenza or pneumonia
All patients over the age of 65 who have not previously been vaccinated and are admitted with CAP should have the pneumococcal vaccine before discharge
Pneumonia MCQs
Dr Chaitanya
1
Most common symptom of the respiratory disease is?
Common sound heard on auscultation in pneumonia is
•Rales
•Ronchi
•Wheeze
•Crackles
crackles
3
An old man comes to u with complaint of fever for 4 days and cough associated with chills. On examination the patient is in respiratory distress and AND HAS HIGH GRADE FEVER OF 104 DEGREE FAHRENHEIT. The most possible diagnosis is
•COPD
•PTB
•Bronchial asthma
•Pneumonia
Pneumonia
4
A pus sample is called purulent if
Pneumonia depiction
•Pus cells > 25 and epithelial cells < 10
•Pus cells > 15 and epithelial cells < 5
•Pus cells > 30 and epithelial cells < 10
•Pus cells > 20 and epithelial cells < 5
A. Pus cells > 25 and epithelial cells < 10
5
A patient who is known case of COPD under medication has complained of increased shortness of breath. He said that he could walk on plane level with his friends easily but now he needs to take break every 100 m or so due to shortness of breath. What is the mMRC grade of SOB for this patient?
1
2
3
4
0
3
6 Difficulty in breathing is called
Dyspnoea
Orthopnoea
Tachypnoea
Apnoea
Dyspnoea
7
Which organism causes the so called walking pneumonia (Hint: atypical pneumonia)
Streptococcus
Klebsiella
H1n1
SARS-CoV2
Mycoplasma
Mycoplasma
8
HAP is called if symptoms/diagnosis
Within 2 days of admission
After 48 hours of admission
2 days of admission to 2 days of discharge
If patient admitted to ICU
2 days of admission to 2 days of discharge
9
Common causative agent for congenital or neonatal oneumonia is
H. influenziae
Chlamydia pneumoniae
Streptococcus pneumoniae
Broup B streptococcus
Gr. B strep
10
In CURB 65 scoring B stands for
Blood urea nitrogen
Blood count
Blood pressure
Breathing
Blood pressure ( sys<90 or dias <60)
11
Lung abscess following pneumonia is caused by
Staphylococcus
Streptococcus
Pneumocystis
Coronavirus
Staphylococcus
12
Antibiotic of choice for CAP in OPD setting is
Amoxycillin
Ciprofloxacin
Metronidazole
Doxycycline
Amoxycillin
13
Pneumothorax is
Hyperexpansion of lungs
Air in thoracic cavity
No breathing by lungs
Lung mixed with ait
Air in thoracic cavity
14
Your patient has BP of 130/90 mm of Hg. What is his MAP
Mycoplasma pneumonia : The dangerous walking talking pneumonia
Table of Contents (toc)
Introduction
Mycoplasma pneumonia is a common cause of respiratory tract infections in
adolescents. It can present with fever, cough, and infiltrates on chest X-ray.
In some cases, mycoplasma infection can also cause skin manifestations such as
vesicles or blisters.
Presenting symtoms of mycoplasma pneumonia
The patient is presenting with symptoms suggestive of Mycoplasma pneumonia,
including fever, cough, and infiltrates on chest X-ray. The presence of
vesicles or blisters on the skin further supports the possibility of
Mycoplasma-induced skin manifestations.
57.Following drugs are effective against Mycoplasma pneumoniae except:
Antimicrobial activity of Amoxycillin is via inhibition of cell wall synthesis which has no role in Mycoplasma.
Penicillin ineffective since mycoplasma have no cell wall.
Treatment (Mycoplasma)
Macrolides
Doxycycline or
Fluoroquinolone
3
MOA
Macrolides
Clarithromycin
Azithromycion
inhibit protein synthesis by blocking translocation: blinds to 23srRNA of 50s ribosomal subunit
Bacteriostatic
Tetracyclines
Tetracycline
Doxycycline
Bind to 30S & prevent attachment of aminoacyl-t RNA Bacteriostatic
Rifamycin
Rifampin
Inhibit DNA dependent RNA polymerase
Rifabutin
Fluroquinolones
Ciprofloxacin
Norfloxacin
Levofloxacin
Inhibit prokaryotic
enzymes topo isomerase II (DNA gyrase) & topoisomerase IV.
FAQs:
1. Can Mycoplasma pneumonia cause skin manifestations?
Yes, in some cases, Mycoplasma pneumonia can cause skin manifestations such as
vesicles or blisters.
2. How is Mycoplasma pneumonia diagnosed?
Mycoplasma pneumonia can be diagnosed through serological testing for
Mycoplasma antibodies or PCR testing for Mycoplasma DNA in respiratory
samples.
3. What is the treatment for Mycoplasma pneumonia?
The treatment for Mycoplasma pneumonia involves the use of antibiotics such as
macrolides or tetracyclines.
4. Is Mycoplasma pneumonia contagious?
Yes, Mycoplasma pneumonia is contagious and can spread through respiratory
droplets.
5. Can Mycoplasma pneumonia cause complications?
Yes, Mycoplasma pneumonia can lead to complications such as pneumonia,
bronchitis, or ear infections.
{
“@context”: “https://schema.org”,
“@type”: “FAQPage”,
“mainEntity”: [{
“@type”: “Question”,
“name”: “1. Can Mycoplasma pneumonia cause skin manifestations?”,
“acceptedAnswer”: {
“@type”: “Answer”,
“text”: “Yes, in some cases, Mycoplasma pneumonia can cause skin manifestations such as vesicles or blisters.”
}
},{
“@type”: “Question”,
“name”: “2. How is Mycoplasma pneumonia diagnosed?”,
“acceptedAnswer”: {
“@type”: “Answer”,
“text”: “Mycoplasma pneumonia can be diagnosed through serological testing for Mycoplasma antibodies or PCR testing for Mycoplasma DNA in respiratory samples.”
}
},{
“@type”: “Question”,
“name”: “3. What is the treatment for Mycoplasma pneumonia?”,
“acceptedAnswer”: {
“@type”: “Answer”,
“text”: “The treatment for Mycoplasma pneumonia involves the use of antibiotics such as macrolides or tetracyclines.”
}
},{
“@type”: “Question”,
“name”: “4. Is Mycoplasma pneumonia contagious?”,
“acceptedAnswer”: {
“@type”: “Answer”,
“text”: “Yes, Mycoplasma pneumonia is contagious and can spread through respiratory droplets.”
}
},{
“@type”: “Question”,
“name”: “5. Can Mycoplasma pneumonia cause complications?”,
“acceptedAnswer”: {
“@type”: “Answer”,
“text”: “Yes, Mycoplasma pneumonia can lead to complications such as pneumonia, bronchitis, or ear infections.”
}
}]
}
Urinary tract infections and calculus UTI and renal stones (nepphrolithiasis), bladder stones
Table of contents (toc)
Introduction to UTI
A urinary tract infection (UTI) is an infection in any part of the urinary system, which includes the kidneys, ureters, bladder, and urethra. Most infections involve the lower urinary tract, specifically the bladder and urethra. UTIs are typically caused by bacteria, most commonly Escherichia coli (E. coli), that enter the urinary tract through the urethra and begin to multiply in the bladder.
Symptoms of uti
Symptoms of a UTI can include a strong, persistent urge to urinate, a burning sensation when urinating, passing frequent, small amounts of urine, urine that appears cloudy, or urine that has a strong odor. If the infection spreads to the kidneys, it can cause more severe symptoms, including fever, back pain, and nausea.
Treatment of UTI
UTIs are more common in women than in men, and they can usually be treated effectively with antibiotics.
Introduction to Nephrolithiasis
Nephrolithiasis, commonly known as kidney stones, refers to the formation of hard mineral and salt deposits in the kidneys. These stones can vary in size and may develop when urine becomes concentrated, allowing minerals to crystallize and stick together.
Symptoms of kidney stones
Kidney stones can cause severe pain when they pass through the urinary tract. Symptoms may include intense pain in the back or side, pain during urination, blood in the urine, and sometimes nausea and vomiting. The pain often starts suddenly and may come in waves as the stone moves.
Type of kidney stones
The main types of kidney stones include calcium stones (the most common type), struvite stones (which can form after a urinary tract infection), uric acid stones, and cystine stones (which are rare and usually occur in people with a genetic disorder).
Treatment of kidney stones
Treatment for nephrolithiasis depends on the size and type of stone. Smaller stones may pass on their own with increased fluid intake and pain management, while larger stones may require medical intervention, such as extracorporeal shock wave lithotripsy (ESWL) to break the stone into smaller pieces, or surgical removal. Preventative measures often include dietary adjustments and medications to reduce the risk of recurrence.
Introduction of urethral dilation in female: 30 causes of painful intercourse
Table of Contents(toc)
female genitourinary system
Urethra dilation is a delicate medical procedure done underanesthesis by a urologist or urosurgeon. The procedure is done after careful evaluation and by well trained professionals. Before going deeper into female urethra dilation lets review anatomy of female urethra in brief.
Urethral structure if pathological narrowing of urethra due to different reasons leading to difficulty passing urine and various other symptoms and consequences.
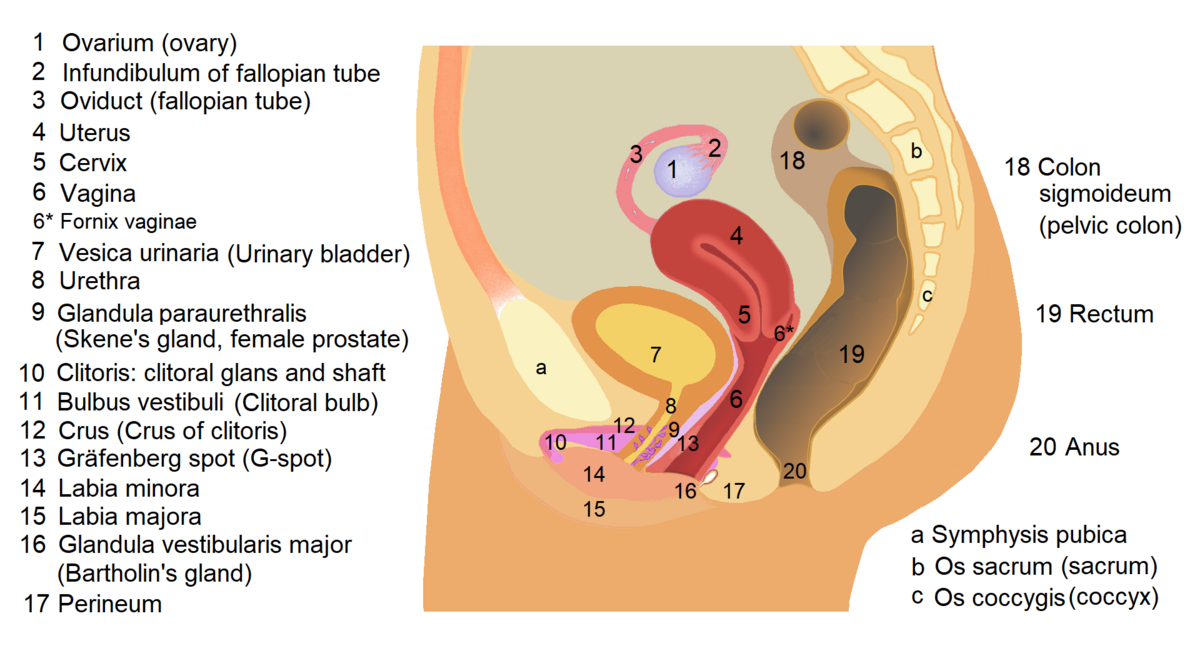
Anatomy of female urethra
Female urethra is tubular musculocutaneous organelle situation in genital region of female that connects bladder to the outer world. The urethra carries urine from bladder to the outside. The flow of urine from bladder is controlled by two valves viz. Internal and external urethral valves. The internal urethral valve is controlled by autonomic nervous system while external is under voluntary control. The overall length of fenale urethra is 4 centimetres or 1.5 inches.
(Source: Textbook of anatomy 7e, Moore et al. )
Female urinary system anatomy
Indications of urethral dilation : an introduction
Sexual intercourse after female urrthra dilatation may become difficult rarely. Difficult or painful sexual intercourse is called dysparaunia and it may have several other causes including vaginal infection, dry vagina and many more listed as below.
Painful sexual intercourse or dyspareunia can be because of external genital problems to internal vaginal, uterine or pelvic disorders. Urethra also being near vagina can be the reason for dyspareunia where as other nearby organs and structures can also be part of it. It is also called genitopelvic pain. The causes of painful intercourse can be listed as below:
The flow of urine from bladder is controlled by two valves viz. Internal and external urethral valves. The internal urethral valve is controlled by autonomic nervous system while external is under voluntary control.
Extreme female urethra dikagyrefers to dilating urethra above the normal anatomical diameter as expected of that age.
This will be done in case of following indications
Aseptic meningitis is a clinical term for an illness comprising meningeal
irritation, fever, and alterations in consciousness of relatively acute
onset.
Changes in mental status or behavior, such as anxiousness or agitation
Burn with Fire
Types of Shock
Hypovolemic Shock
Cardiogenic Shock
Neurogenic Shock
Anaphylatic Shock
Septic Shock
Introduction to BURN
Burns are tissue damage that results from heat, overexposure to the sun or other radiation, or chemical or electrical contact.
Wound with destruction of tissue due to coagulation necrosis.
Causes of burn
Thermal burn/heat burn: dry heat
Scald: moist heat
Electric burn: electricity
Cold burn: frost bite
Chemical burn: strong acid and alkali
Radiation burn: X-rays, Gamma rays
Degree of Burn Classification and grading
First degree – superficial thickness
Second degree – Partial or intermediate thickenss
Third degree – Full thickness
Fourth degree
Management of burn
Remove burning source immediately.
Wrap the patient in a cloth and roll him in the floor.
Immerse 10-15 minutesin water or cool down the burnt part in running water for 15 minutes
Give liquids orally. Provide analgesics and antibiotics.
Do not rupture blister.
TT injection
First-degree burns:
Run cool water over the burn. Don’t apply ice. For sunburns, apply aloe vera gel. For thermal burns, apply antibiotic cream and cover lightly with gauze. You can also take over-the-counter pain medication.
Second-degree burns:
Treatment for second- and first-degree burns is similar.
Stronger antibiotic – such as silver sulfadiazine, to kill bacteria
Elevating the burned area can reduce pain and swelling.
May need dressing to be applied
Third-degree burns:
Third-degree burns can belife-threatening and often require skin grafts. Skin grafts replace damaged tissue with healthy skin from another of the uninjured part of the person’s body.
Wallace Rule of Nine
The Wallace Rule of Nines is a method used to estimate the total body surface area (TBSA) affected by burns. It divides the body into sections, each representing approximately 9% (or multiples thereof) of the total body surface area. The distribution is slightly different for adults and children due to differences in body proportions.
Wallace Rule of Nines for Adults:
Head and Neck: 9%
Each Arm: 9% (4.5% front, 4.5% back)
Each Leg: 18% (9% front, 9% back)
Anterior Torso (Chest and Abdomen): 18%
Posterior Torso (Back and Buttocks): 18%
Perineum/Genitalia: 1%
Wallace Rule of Nines for Children:
Head and Neck: 18% (larger proportion due to the relatively larger head size in children)
Each Arm: 9% (4.5% front, 4.5% back)
Each Leg: 14% (7% front, 7% back; less than in adults because legs are relatively shorter)
Anterior Torso (Chest and Abdomen): 18%
Posterior Torso (Back and Buttocks): 18%
Perineum/Genitalia: 1%
These percentages are used to help us quickly estimate the extent of burns and its severity, which is critical for determining the severity of the injury and guiding treatment decisions, such as fluid resuscitation and transfer to a specialized burn center.
Parkland Formula:
The Parkland formula, also known as the Baxter formula, is used to calculate the amount of fluid required for resuscitation in burn patients within the first 24 hours after injury. The formula is based on the patient’s weight and the total body surface area (TBSA) burned.
Total fluid requirement:4 mL×body weight (kg)×% TBSA burned4 , text{mL} times text{body weight (kg)} times text{% TBSA burned}
4mL×body weight (kg)×% TBSA burned
Administration:
First 8 hours: Administer half of the total fluid requirement.
Next 16 hours: Administer the remaining half.
Example for an Adult:
If an adult weighs 70 kg and has 30% TBSA burns:
Total fluid requirement:4×70×30=8,400 mL4 times 70 times 30 = 8,400 , text{mL}4×70×30=8,400mL
First 8 hours:8,400/2=4,200 mL8,400 / 2 = 4,200 , text{mL}8,400/2=4,200mL
Next 16 hours:4,200 mL4,200 , text{mL}4,200mL
The Parkland formula provides an initial guideline for fluid resuscitation, but ongoing assessment and adjustments based on the patient’s clinical response (urine output, vital signs, etc.) are critical for effective management.
OTHER CONCEPTs on bubrn management
Patient may require IV antibiotics for infection prevention/control
If oral intake not possible IV fluids till oral can be started
{
“@context”: “https://schema.org”,
“@type”: “FAQPage”,
“mainEntity”: [{
“@type”: “Question”,
“name”: “What are Signs and symptoms of Burn?”,
“acceptedAnswer”: {
“@type”: “Answer”,
“text”: “Cool, clammy skin
Pale or ashen skin
Bluish tinge to lips or fingernails (or gray in the case of dark complexions)
Rapid pulse
Rapid breathing
Nausea or vomiting
Enlarged pupils
Weakness or fatigue
Dizziness or fainting”
}
},{
“@type”: “Question”,
“name”: “What are Types of Shock?”,
“acceptedAnswer”: {
“@type”: “Answer”,
“text”: “Hypovolemic Shock
Cardiogenic Shock
Neurogenic Shock
Anaphylatic Shock
Septic Shock”
}
},{
“@type”: “Question”,
“name”: “What are causes of Burn?”,
“acceptedAnswer”: {
“@type”: “Answer”,
“text”: “Thermal burn/heat burn: dry heat
Scald: moist heat
Electric burn: electricity
Cold burn: frost bite
Chemical burn: strong acid and alkali
Radiation burn: X-rays, Gamma rays”
}
},{
“@type”: “Question”,
“name”: “What is clasification of burn?”,
“acceptedAnswer”: {
“@type”: “Answer”,
“text”: “First degree – superficial thickness
Second degree – Partial or intermediate thickenss
Third degree – Full thickness
Fourth degree”
}
},{
“@type”: “Question”,
“name”: “What is Management of burn?”,
“acceptedAnswer”: {
“@type”: “Answer”,
“text”: “Remove burning source immediately.
Wrap the patient in a cloth and roll him in the floor.
Immerse 10-15 minutes in water or cool down the burnt part in running water for 15 minutes
Give liquids orally. Provide analgesics and antibiotics.
Do not rupture blister.
TT injection
First-degree burns:
Run cool water over the burn. Don’t apply ice. For sunburns, apply aloe vera gel. For thermal burns, apply antibiotic cream and cover lightly with gauze. You can also take over-the-counter pain medication.
Second-degree burns:
Treatment for second- and first-degree burns is similar.
Stronger antibiotic – such as silver sulfadiazine, to kill bacteria
Elevating the burned area can reduce pain and swelling.
May need dressing to be applied
Third-degree burns:
Third-degree burns can be life-threatening and often require skin grafts. Skin grafts replace damaged tissue with healthy skin from another of the uninjured part of the person’s body.”
}
}]
}
Disulfiram like Reaction (disulfiram-like reaction) Mnemonics
Table of Contents(toc)
Introduction
You can use any of the below mnemonics to remember Disulfiram like Reaction (disulfiram-like reaction).
Disulfiram is a drug commonly used to treat alcohol abude and dependance in outpatient and inpatient settings.
capsules disulfiram
How does disulfiram reaction occur?
The disulfiram reaction occurs when disulfiram inhibits the enzyme aldehyde dehydrogenase, which is responsible for metabolizing acetaldehyde, a toxic intermediate of alcohol metabolism. Normally, alcohol is metabolized in two steps: ethanol is converted into acetaldehyde by alcohol dehydrogenase, and acetaldehyde is further broken down into acetic acid by aldehyde dehydrogenase. Disulfiram blocks the second step, causing acetaldehyde to accumulate in the bloodstream. This accumulation triggers symptoms such as flushing, nausea, vomiting, headache, tachycardia, and hypotension within 10–30 minutes of alcohol ingestion. The severity of symptoms depends on the amount of alcohol consumed and the disulfiram dose.
Many people want to buy antabuse in UK. They want to terminate their habit of abuse of alcohol and other medications.
Availability of Disulfiram in the UK
Disulfiram, commonly known by the brand name Antabuse, is available in the UK as a prescription-only medication used to support the treatment of chronic alcohol dependence. To obtain disulfiram, you must consult a healthcare professional who can assess your suitability for the medication and provide a prescription if appropriate. It’s important to note that disulfiram is typically prescribed as part of a comprehensive treatment plan, including counseling and support, to enhance its effectiveness in promoting abstinence from alcohol.
Disulfiram Dosing and Formulations According to the BNF
The British National Formulary (BNF) provides guidance on the dosing and formulations of disulfiram. Disulfiram is available in oral tablet form, with a common strength being 200 mg. The usual starting dose for adults is 200 mg daily, which may be increased if necessary, up to a maximum of 500 mg daily, depending on individual response and tolerance. It’s crucial that disulfiram is administered under medical supervision, with regular monitoring to assess efficacy and any potential adverse effects. Patients should be informed about the reactions that can occur if alcohol is consumed while taking disulfiram and advised to avoid all sources of alcohol, including those found in certain foods and medications.
Disulfiram Implants in the UK
Disulfiram implants are an alternative method of delivering the medication, involving the surgical insertion of disulfiram pellets under the skin. This method provides a sustained release of the drug over a period, potentially improving adherence by eliminating the need for daily oral dosing. In the UK, disulfiram implants are not widely available and are considered an off-label treatment option. Some private clinics may offer this service; however, it’s essential to approach such treatments with caution. The efficacy and safety of disulfiram implants are subjects of ongoing research, and they should only be considered after thorough consultation with a qualified healthcare professional who can provide guidance based on current clinical evidence and individual patient circumstances.
For more detailed information on disulfiram, including its dosing, formulations, and considerations regarding implants, consulting the BNF and seeking advice from healthcare providers is recommended.
NCell Services in Nepal: Recharge, Data Packs, Customer Care, and More
Introduction:
Telecommunications services have become an essential part of our daily lives in recent years. NCell is a major player in this sector in Nepal. NCell, a leading telecommunications provider, provides a variety of services such as recharge options, data packs, customer care support, and much more. This article will delve into NCell’s diverse offerings and shed light on how it has emerged as a significant player in Nepal’s telecom industry.
1. NCell Recharge: A Hassle-Free Approach to Stay Connected
Keeping your phone’s credit card charged is critical for uninterrupted communication. NCell provides a simple recharge process, allowing users to recharge their phones via mobile apps, online portals, or retail outlets. We will look at the various recharge options available and how NCell has made the process easier for its customers.
1. Online Recharge:
Most service providers have online portals or mobile apps where you can log in to your account and recharge your NCell. Follow these steps:
Visit the official website or download the mobile app of your N-Cell service provider.
Log in to your account using your mobile number and password.
Look for the “Recharge” or “Top-up” section within the app or website.
Choose the amount or plan you want to recharge with.
Provide your payment details, such as credit or debit card information, or use any other available payment method.
Confirm the recharge to complete the process.
2. USSD Code Recharge:
Many service providers offer USSD codes that allow you to recharge your NCell directly from your phone. Here’s how:
Dial the USSD code provided by your NCell service provider. For example, it might be something like *123#.
Follow the on-screen instructions to select the recharge amount or plan.
Provide the necessary information, such as your mobile number and payment details if required.
Confirm the recharge to complete the process.
3. Retailer or Store Recharge:
You can also visit a nearby authorized NCell retailer or store to recharge your phone. Provide them with your mobile number and the amount you wish to recharge with, and they will do the rest.
4. Mobile Wallet Recharge:
If you have a mobile wallet like eSewa, Khalti, or other similar services available in your country, you can use it to recharge your NCell as well. Simply select the “Mobile Recharge” option within the wallet app, choose NCell as the operator, and follow the instructions to complete the recharge.
2. Unveiling the Power of NCell Data Packs
Access to mobile data is essential in today’s increasingly digital world. NCell offers a variety of data packs to meet a variety of needs, from light internet browsing to heavy video streaming. By analyzing the available data packs and their competitive pricing, we can better understand how NCell keeps its users connected to the online world.
Summary of how data packs are purchased on Ncell:
1. Check Available Data Packs:
Dial *17123# or visit the Ncell website to check the available data packs. You will receive a list of different data packs, along with their validity and prices.
2. Choose a Data Pack:
Based on your internet usage needs and budget, select the data pack that suits you best.
3. Recharge Your Account:
Make sure you have sufficient balance in your Ncell account to purchase the data pack. If not, recharge your account using the available top-up options.
4. Purchase the Data Pack:
On Ncell, there are several ways to purchase a data pack: USSD Code:
Dial the USSD code for the data pack you wish to purchase. For example, you could dial *17123# and then follow the on-screen instructions to select and purchase the desired data pack.
SMS:
Send a specific keyword to a designated number to activate the data pack. For example, you could text “DataPack1GB” to a specific number. Ncell App:
Download and install the official Ncell mobile app (if available) and use it to purchase data packs directly from your smartphone. Online:
To purchase data packs from Ncell’s online portal, go to their official website and log in to your account.
5. Confirmation:
After you purchase the data pack, Ncell will send you a confirmation message indicating that the data pack has been activated on your number.
Remember to check the validity and terms of the data pack you choose, as they may vary depending on the pack’s size and cost. Additionally, it’s essential to keep an eye on your data usage to avoid unexpected charges after your data pack’s validity expires.
Always refer to Ncell’s official website or contact their customer support for the most accurate and up-to-date information on data packs and their purchase process.
3. NCell Customer Care:
Customer service is critical to any telecom company’s ability to ensure customer satisfaction and quickly resolve issues. We will look at NCell’s customer service, including the various channels through which customers can get help, their response time, and how they ensure a positive customer experience.
1. Ncell Helpline (Dial 9005 or 9007):
Dial 9005 or 9007 from your Ncell mobile number to speak with a customer care representative directly.
You can inquire about various services, data packs, account information, billing, and other related issues.
Make sure to include your mobile number and a detailed description of your query or issue in the email.
3. Ncell Website:
Visit the official Ncell website (www.ncell.axiata.com) and navigate to the “Contact Us” or “Support” section.
There, you may find a web form or live chat option to communicate with their customer care team.
4. Social Media:
Ncell may have active social media accounts on platforms like Facebook and Twitter.
You can send a message or tweet to their official social media accounts for assistance.
5. Ncell Stores and Retailers:
You can visit the nearest Ncell store or an authorized retailer to get help with your queries or issues.
When contacting Ncell’s customer care, ensure that you have your mobile number and any relevant account details readily available for verification purposes. Be clear and concise while explaining your query to receive prompt and accurate assistance.
Please note that customer care contact information and methods may change over time, so it’s always a good idea to check Ncell’s official website for the most current information on how to contact their customer care team.
4. NCell in Nepal:
The presence of NCell in Nepal has had a significant impact on the country’s telecommunications landscape. We will take a closer look at the company’s evolution, from inception to dominance in the market. In addition, we will look at how NCell’s services have aided Nepal’s digital transformation.
5. Understanding Parallel Combination of NCell: A Unique Offering
The advantages of parallel combinations of NCell connections have gained popularity among users. We will look at how this feature works, what benefits it provides, and how users can use it to their advantage.
6. NCell Balance Transfer:
Running out of balance at a critical juncture can be aggravating. Fortunately, NCell users can send balance to friends and family. We will talk about the balance transfer process, its limitations, and how NCell’s customers have embraced it.
Dial the balance transfer code: *17122*<Receiver’s Mobile Number>*<Amount># on your Ncell mobile phone.
Replace <Receiver’s Mobile Number> with the recipient’s Ncell number.
Replace <Amount> with the specific amount you want to transfer (e.g., 10, 20, 50, etc.).
Confirm the transfer by following the instructions provided in the next step.
You will receive a confirmation message once the balance transfer is successful, and the transferred amount will be deducted from your account.
Please keep the following points in mind:
You can only transfer the balance in multiples of the specified amount, which usually begins at Rs. 10.
There may be a service charge for balance transfers, and it is deducted from the sender’s account.
The recipient’s number must be an Ncell prepaid number; you cannot transfer the balance to postpaid numbers or numbers from other telecom operators.
Make sure you have sufficient balance in your account to cover the amount you want to transfer, including any service charges.
7. Buy NCell Pack: The Allure of NCell Services
With a wide range of telecommunication services available, we will examine what differentiates NCell from its competitors. We will look at why customers choose NCell services, from exclusive offers to robust network coverage.
Conclusion:
As Nepal’s telecommunications sector evolves, NCell continues to be a driving force in providing dependable and innovative services to its customers. NCell has established itself as a key player in the industry, offering convenient recharge options and data packs, as well as exceptional customer care support. As we move forward, NCell’s dedication to digital connectivity and customer satisfaction ensures its position as Nepal’s leading telecom provider.